How to Differentiate the Same Experiment for Multiple Grades and Abilities
You find a wonderful experiment to conduct with your students. The problem is you don't have the time or know-how to adjust the experiment for all of your student's abilities. You may be a science lab teacher with 5 different grades to plan for. Maybe you homeschool, so using the same supplies will save time and money. It can be done with some simple steps and a little prep.

https://bit.ly/30WmDLm
Adjusting an experiment for several grades and ability levels helps
- students have a positive experience.
- students progress in their scientific process skills.
- by revisiting experiments years later when students can dig deeper into the science concept. Make a cloud in a bottle in Kindergarten, but you can expand on clouds again in 3rd grade.
- students to enjoy the experiment at their reading level without missing the science phenomenon being taught.
- save on the budget by using shared supplies.
- for creating homogenous groups to allow better scientific discourse.
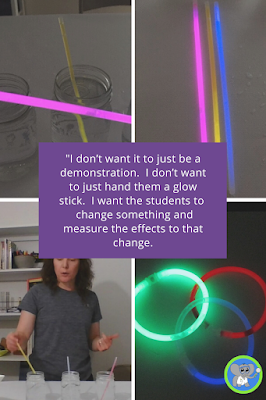
Below, we will explain the steps of creating a glow stick experiment. Glow sticks are great because any grade can explore them. They are inexpensive and easy to use.
 Step1:

Decide on what you will change and measure. This is not just a demonstration but an experiment. You may need to research the concept that the demonstration teaches. With glow sticks, we know they are a chemical reaction. If you heat up a chemical reaction, it will go faster. We also wonder if the color affects how long they will glow.
We could change the temperature of the glow sticks and measure how bright they glow. We could change the color of the glow stick and measure how long they glow. (This one might take a while, so we will choose the temperature of the glow stick.)
Step 2:

Now, you will choose what each level will test. Follow these guidelines for your grade levels.
K-1 Only has two changes. This will be things like with and without, hot and cold, big and small, red and blue. This gives the students a simple change so they have something to compare and discuss.
I will test glow sticks in hot and cold water.
2-3 Now we can expand further. We move up to 3 levels. This is where it becomes a little more technical, but not too much. You could test hot, cold, and room temperature. You could also test small, medium, and big glow sticks. Add another color to test. Just remember you can only change one thing.
For our example, we will test hot, room temperature, and cold glow sticks. They will only conduct 1 trial unless you feel they are ready to do more than one trial. This will depend on their attention span, class time, and your budget for supplies.
4-5 We can really expand for this age level. They can now do more than one trial because they are learning how to find the mean, median, and mode. The math teachers will love that! If more trials do not work, add in a 4th level. We could test hot, warm, room temperature, and cold glow sticks.
Step 3:
Now, you will decide what to measure.
K-1 Keep it simple. Since it only compares two things, they can say which one is brighter. They could do a simple rank to create a graph. 0-no glow. 1-some glow 2-lots of glowing.

2-3 Now, the students have 3 tests to compare. We want to be specific. We also want them to be able to graph. In our glow stick experiment, we will do a rank. They will rank the brightness from 0-3. For other experiments, you may measure the time it glows. Now you have one age level ranking the glow and one age level performing 3 levels.
4-5 This grade level usually measures the same thing as grades 2-3. The main difference is that they complete more than one trial or perform 4 levels. If time is limited in the classroom, have groups share data to make 3 trials. They will then graph their mean, median, or mode. Since we are ranking the glow, we will calculate the mode(most frequent.)
Step 4
You could conduct the experiment without a formal write-up, which can be tricky. Students will forget what happened, and they need a place to write observations and a template for their graph. Try using a lab template to guide them. This template comes in all 3 levels. The teacher can create it beforehand, or the students can help.
Things to consider for your lab journal.
K-1 Include word boxes for students to circle a choice. Have checkboxes for choosing a hypothesis. For the graph, create premade squares for coloring in the ranking. Complete the summary sentence together or have those checkboxes and word boxes again.
2-3 Still use word boxes for the hypothesis. Introduce the terms increase, decrease, and stay the same for the word boxes. The graph should have the labels done so the students can focus on just inputting their results. Create a summary that is fill in the blanks. 3rd grade is in transition. They may not need word boxes and can handle more. See where your students are at.

4-5 Now, the students are ready for a more blank journal. For the science lab teacher, this is fantastic. You have had these kids since kindergarten; they are now in 4th and 5th grade. They know the format and are ready to show you your skills. This journal will take them step by step.
As a family, you can now conduct the experiment together.
The K-1st grader will finish first but can explore further and develop fun ideas. Here is what it looks like.
K-1st Graders will conduct an experiment with a glow stick in hot and cold water. They will rank the glow and create a simple graph. We will write a conclusion together. Afterward, they can explore with the glow sticks.
2nd and 3rd Graders will conduct an experiment with a glow stick in hot, cold, and room-temperature water. They will rank the glow, create a graph, and write summaries and conclusions. After, they can explore further.
4th and 5th Graders will conduct an experiment testing hot, cold, and room temperature water. They will rank the glow and conduct 3 trials of each. They will calculate the mode for a graph. They will write detailed summaries and conclusions and analyze the experiment. They can explore further after.
You will find that your lessons are more cohesive and focused on the science concept you are teaching. Because they test several levels, they will get to see the concept in action. It makes it so unforgettable.
Want to Learn More. Watch the Video
SHOP THIS POST


LEARN MORE


